2 DIY Projects for a Modern Dining Room Upgrade
I love to DIY my home, but there are only so many rooms in my house and so much budget available to make changes. So, in the rare moments that I’m between projects, I have been extremely fortunate to have a good friend who trusts me to DIY her home. It’s such a rewarding experience to help a friend make her house a home, and this DIY dining room transformation was no exception!
So far, I’ve updated both of her kids’ rooms, shopped for a giant mirror above her fireplace, helped with design elements like choosing flooring, and I updated her foyer. This post is all about how we transformed their dining room from a drab catch-all former office to a gorgeous space for their family and friends to gather. Click here to see the TikTok video that captures all the great details from the room!
The Gamechanger Projects
I am so proud of this DIY dining room project. It really transformed the feel of the main level of their home. The best thing about it is that most of the impact felt in this room comes down to two simple projects: decorative trim and wallpaper. Keep in mind that I finished this project back in December, so the whole room is decorated for the season!
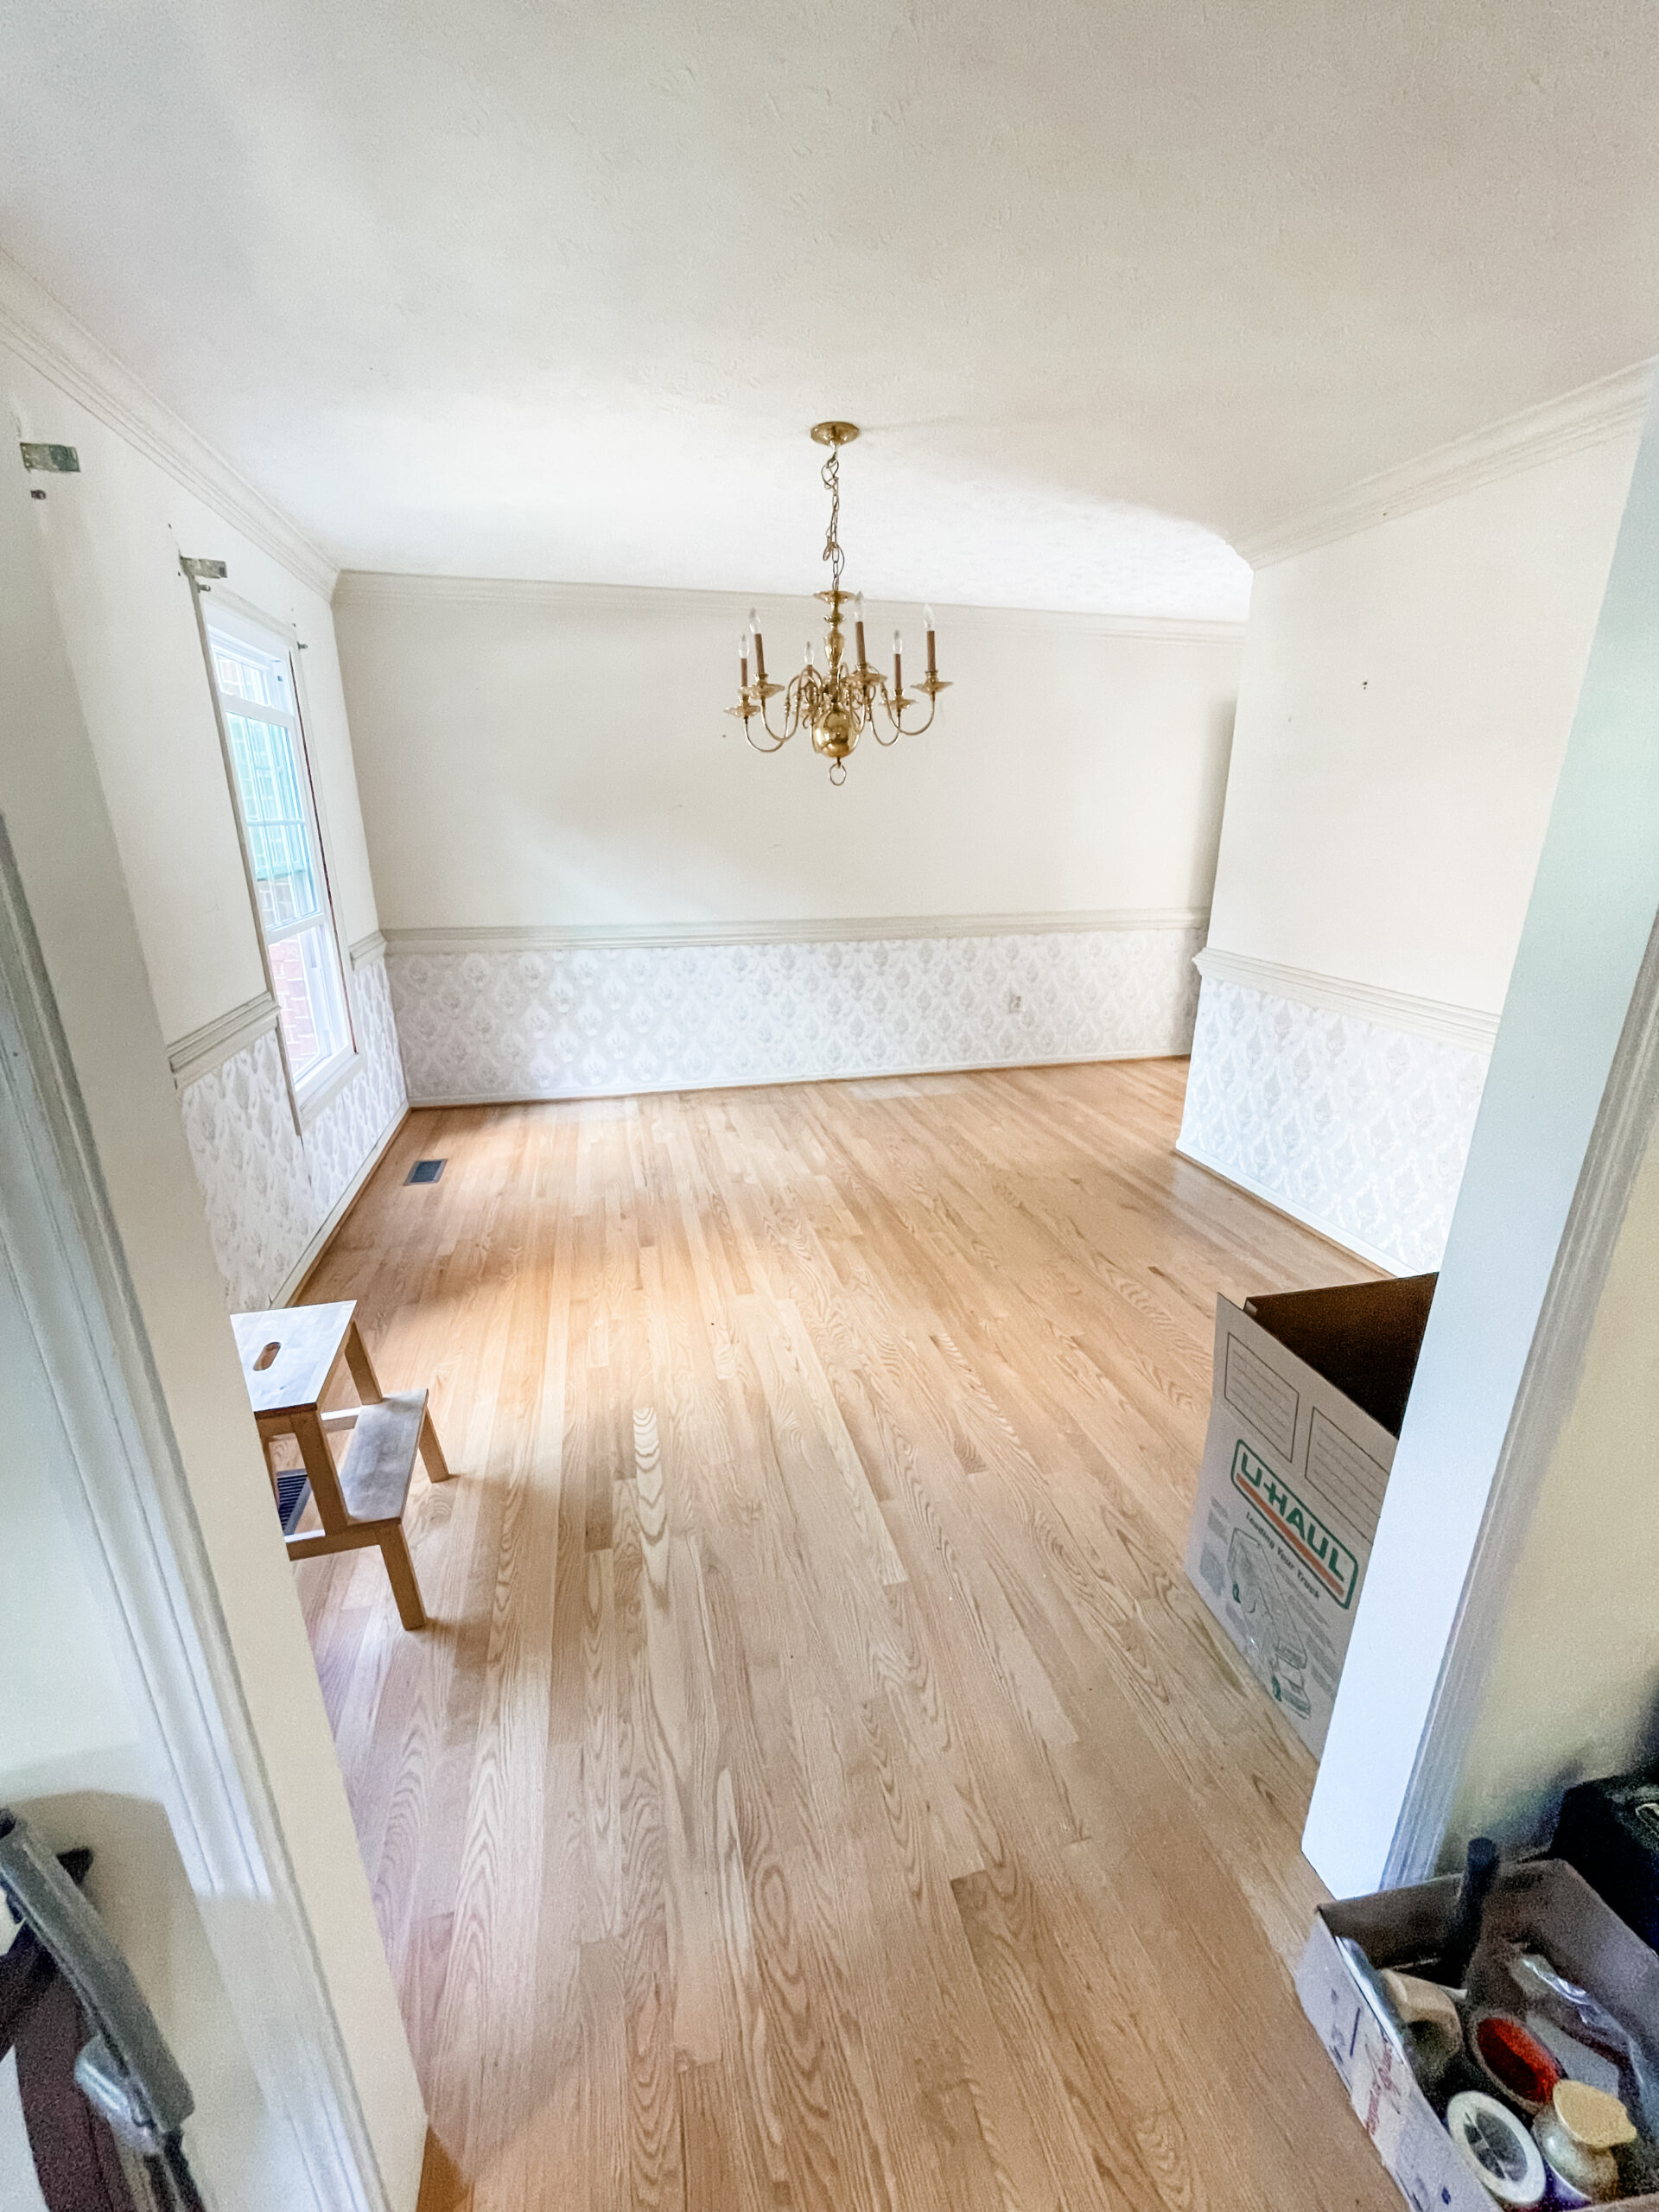
The Before
My friends purchased this house from their parents. When they first moved in, it still contained a lot of their parent’s belongings. Step one was to empty out the space to make room for this transformation. Every family lives differently. Some people are maximalists who like to surround themselves with things they love. My friends are not that, and the clutter in this space was a real drag on their family. My TikTok video of this project shows a before view of the room.
Phew, it was a doozy, but the state of the before makes this DIY dining room transformation even more spectacular. After working with them on several other rooms in their house, I felt confident about their style and comfort level with wallpaper and wall trim projects.
Establish Your Design Foundation
If I’m not careful, I’m going to get a reputation for adding wallpaper and wall trim to every room. I can’t help it! The difference those two elements make in a home is striking. When designing a room, the first thing I start with is selecting the big elements: flooring, wallcoverings, paint, etc. Once you’ve established a design foundation for your room, you can move on to the details. Getting the foundational elements in place makes choosing furniture and decor that will coordinate much easier.
That said, a pillow or a rug sometimes inspires people. If you find yourself inspired to design a room based on a beloved accessory, that’s ok. I still recommend you use that piece to figure out your foundational design elements. Then, you can continue to build a room that you’ll love, that looks cohesive, and fits the style of your home.
The first big choices I made in this DIY dining room project were this wallpaper, the design for the picture railing, and the paint color. I wanted to use a neutral color palette that would blend with the rest of their house but also colors that would coordinate with the large antique dining table and chairs they already owned. Below, you can see a close-up of the wallpaper and trim details.

The Wallpaper Saga
I’ve never worked with a wallpaper like this Allen and Roth wallpaper before. As nice as it looks in these photos, it’s even more stunning in person. The linen-type pattern gives a depth and texture that makes the whole room feel warm and elegant. When I first began applying the paper, I noticed that side by side, each of the sheets of paper looked slightly different than the next. You can see this in the TikTok video.
I thought for a few moments that we might need to take it all down and start over, but the internet came in handy, as it often does! I went back through and cut a zig-zag pattern into each sheet of paper where it overlapped with the next sheet, and the color difference that had been so noticeable completely disappeared. I’m still not sure how that works. It’s a DIY miracle!
Here are some things you should know if you’re planning to hang wallpaper in your home:
- Prepare the Walls – Clean, smooth, and prime the surface to ensure the wallpaper adheres properly and lasts longer. Wallpaper works best on a flat surface.
- Measure and Cut Accurately – Incorrect measurements can lead to wasted materials, I recommend leaving a little extra at the top and bottom for adjustments.
- Match the Patterns – If using patterned wallpaper, align the design carefully between strips for a seamless look.
- Use the Right Adhesive – Different wallpapers require specific adhesives, so check the manufacturer’s recommendations. This doesn’t apply to peel-and-stick wallpapers.
- Smooth Out Bubbles – Use a smoothing tool or brush to remove air bubbles and creases as you go.
- Work in Sections – Apply wallpaper one strip at a time, ensuring it’s straight before moving to the next. I used a laser light to get started. Once the first piece is up, everything else should be aligned.
- Allow for Drying Time – Avoid touching or adjusting the wallpaper too much after application to let the adhesive set properly.
The Perfect Picture Frame Molding
Hanging picture frame molding and chair rails in a dining room is a great way to add elegance and architectural detail to the space. Picture frame molding is a purely decorative element, often arranged in symmetrical boxes or rectangles, while chair rail serves both a decorative and practical purpose, protecting walls from scuffs and furniture damage. In this room, I installed the molding around the whole room, but it would also make for a great accent wall. I used a picture frame molding that was pre-assembled from Lowes, so all I had to do was use my nail gun and caulk to attach it to the wall!
Here’s a great picture where you can see the molding details across the whole space.
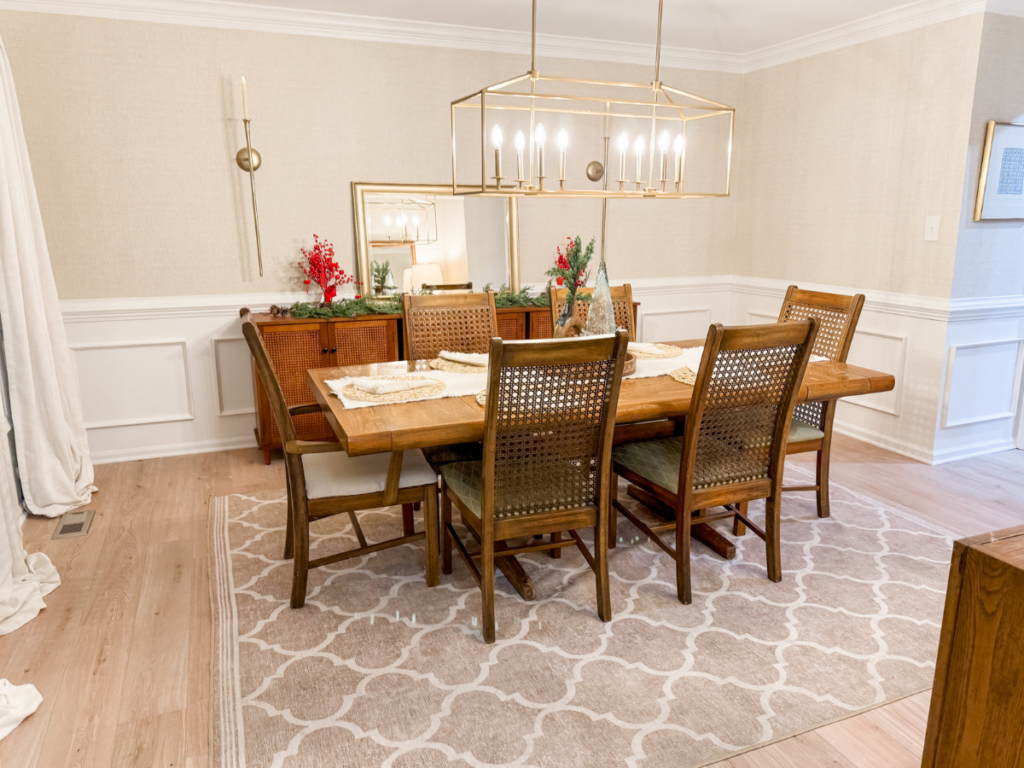
Chair rail should typically be placed about one-third of the way up the wall. This ensures the trim is in the right place to connect with the back of a dining chair. Picture frame molding can then be installed below or above the chair rail (or both), depending on the style you’re going for. Use a level and painter’s tape to map out the layout before committing to installation. Precision will make your project look more professional. I recommend taking the width of the wall and dividing it evenly so your boxes are all the same shape.
Precision is key when installing trim. I typically use these miter shears to cut molding pieces and this nail gun to affix them to the wall (if you don’t already have RYOBI cordless tools, you’ll need to purchase the battery as well). If your walls are textured or uneven, you can use caulk to fill any small gaps for a polished finish.
Once installed, use wood filler to fill the nail holes. Then, prime and paint the molding to match (or contrast with) the wall color. Whether you prefer classic white molding for a timeless look or a bold color to make a statement, this DIY project can transform your dining room into a sophisticated and stylish space.
For this project, we purchased pre-assembled picture frame molding. You can get them at a store like Lowes or Home Depot. This made assembly incredibly easy. All we had to do was measure out where they should go and use the nail gun to attach them to the walls.
5 Things to Remember When Installing Picture Frame Molding and Chair Rail
- Measure and Plan Carefully – Use painter’s tape to lay out your design on the wall before making any cuts to ensure proper proportions and spacing.
- Create a Cut List – Make a list of all the cuts you need to make so you can cut them all at once.
- Use the Right Tools – Miter snips, a level, measuring tape, a nail gun, and construction adhesive will make installation smoother and more precise.
- Consider Wall Texture – If your walls are not perfectly smooth, use caulk to fill gaps and sand rough areas before painting.
- Prime and Paint Before Installation – Pre-painting the molding can make the finishing process easier and help avoid getting paint on the walls.
- Secure Pieces Firmly – Use a combination of nails and adhesive to prevent molding from shifting over time, especially in homes with slight wall movement.
Using the Homeowner’s Dining Set
The homeowners already had this beautiful dining set, so we used their own table and chairs. After all, the best table is the one you already own and love. Designing your home around collected items rather than all brand-new pieces creates a space that feels personal, layered, and full of character. Incorporating heirlooms and pieces that have a story adds a sense of history that mass-produced furniture simply can’t replicate.

Another thing to note about collected or antique items is that they’re often made of solid wood and have better craftsmanship than store-bought items. In my experience, these pieces are stronger and stand up better to the wear and tear of everyday life. Especially if you have young kids running around like my friend and I still do. Mixing old and new pieces also allows for greater creativity and flexibility, making it easier to design a space that evolves with your tastes over time.
If you really want to make a huge difference, you could do your own DIY dining table project. Here is a good example of a simple DIY dining table that anyone can do. Or, you could consider making a tabletop out of butcher block and purchasing table legs to attach. It’s all up to how handy you’re feeling.
DIY Dining Room Buffet
Ok, this project is something I’m pretty proud of! The homeowner had a small cabinet in the room already. It matches the table and chairs and fits really nicely in this nook, as you can see below. The large mirror and oversized decor (all thrifted) really elevate this little corner of the room.

We needed a piece of storage furniture to fit the longest wall in the room, but I wanted to make sure it looked great with the existing pieces. I love the woven look of the piece above, but I wasn’t finding what I needed in the right size and style at my local thrift stores.
So, I turned to Wayfair as I often do and found this beauty. It comes in a set of two, so I grabbed 2 sets and pushed them together to function as a buffet. The 4th piece went into their family room, and I love the way that it helped tie the spaces together. It’s just the right size to fill this long space and give plenty of storage for serving dishes, linens, and anything else they want to hide away!
Above it, I hung these stunning ZGallerie sconces. The candle sticks are battery-operated and look so realistic, which means no wax drips and no fire hazards.

Finishing the Room with Decor
This project was finished during the holiday season, so I used a combination of season decor and unique crystal objects. You can see here that I purchased these to fill the space and then let the homeowner decide if she wanted to keep them before removing the tags.

My whole home is filled with unique and special decor items I’ve sourced from thrift stores. I did the same thing for this DIY dining room. The decor is a combination of thrifted and store-bought items that came together really beautifully.
Thrifting home decor is a fantastic way to find unique home décor at a fraction of the cost of retail stores. Thrift shops are treasure troves of high-quality, one-of-a-kind pieces, from vintage furniture and artwork to decorative accessories like vases, mirrors, and lamps. Many of these items are well-made, often crafted from solid wood or durable materials that stand the test of time.

Shopping secondhand also allows you to create a more personalized and eclectic home, mixing styles and eras for a curated look. Beyond the savings, thrifting is a sustainable choice, keeping usable items out of landfills and reducing demand for mass-produced goods. With a little patience and a keen eye, you can transform your space with affordable, stylish finds that make your home truly special.
In the back of the photo below, you can see the long cream-colored curtains that pool on the floor hung from the beautiful gold heavy-duty curtain rod. You can check here for an article about how to hang curtains higher to create a really elevated look.

I hope you like this room as much as I do. It was such a fun experience renovating this space for my friend and her family. If you have questions or want details from this room, send me a message. I’m here to help. If you want to follow along with more of my projects, find me on social media!


